
This is a Amazon big data tutorial which combine the functionality of Elastic Map Reduce ( EMR) and MicroStrategy BI tool for data exploration.
Note: the below procedure will incurred both the AWS EMR, S3 storage and MicroStrategy software charges.
- Select the Elastic MapReduce tab.
- Select the your Region.
- Click “Create New Cluster.”
- Choose a descriptive name for your cluster, for example, “xxxx.”
- In the “Type of Instance” list, select “Large (m1.large)” or smaller instances will be fined too.
- Specify an EC2 key pair in the “Advanced Options” and click “Continue”.
- Accept the default selection to “Proceed with no Bootstrap Actions” and click “Continue”.
- On the job flows page, wait until the job flow enters the “WAITING” state and then click “Refresh.”
- Select the job flow and find the DNS name of the master node in the detail pane in the bottom half of the screen.
- Save the master DNS name. You’ll use it to ssh to the master node.


Note: Ensure your VPC DNS resolution and DNS hostname both are set to Yes.
Or else you may do the following to enable them:
a) Open the Amazon VPC console at https://console.aws.amazon.com/vpc/.
b) In the navigation pane, choose Your VPCs.
c) Select the VPC from the list.
d) Review the information in the Summary tab. In this example, both settings are enabled.
f) The DNS Settings tab
g) To update these settings, choose Actions and either Edit DNS Resolution or Edit DNS Hostnames. In the dialog box that opens, choose Yes or No, and Save.


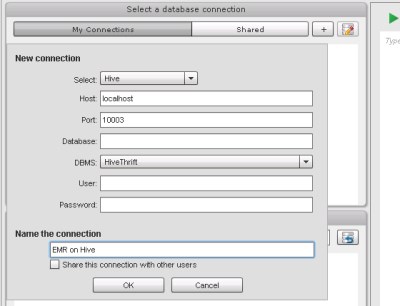
Setup a MicroStrategy AMI from AWS marketplace as below:


- Start PuTTY.
- Specify master node DNS name as the Host Name.
- Make sure the SSH port is set to 22.
- Under Category, expand Connection, then SSH, and select Tunnels to open the Options controlling SSH port forwarding page.
- Specify 10003 as the Source port. (This assumes you used the default version of Hive, 0.8.1, on the Amazon EMR cluster. Otherwise specify the correct port for your version.)
- Specify localhost:10003 as the Destination port
- In the section with radio buttons, select Local and Auto.
- Click the Add button. This should create an entry L10003 localhost:10003.
- Now navigate to Connection >> SSH >> Auth to set up the private key settings.
- Click Browse under Private key for authentication and choose the location where you saved the .ppk key file.
- Navigate to Connection >> Data and type
hadoopas the Auto-login username. - In the Category pane, click Session to go back to the main page.
- In Saved Sessions, specify a name for this setting and click Save. Next time you can select this setting and click Load.
- Click Open to create the SSH tunnel.
It is nice blog Thank you porovide importent information and i am searching for same information to save my timeBig Data Hadoop Online Training
Awesome post presented by you..your writing style is fabulous and keep update with your blogs <a href="https://onlineitguru.com/aws-online-training-placement.html" title="AWS Online Training | AWS Certification Online Course in India | Online IT Guru\” rel=\”nofollow\”>AWS Online Training